In Matrix, the Deal is your opportunity, or revenue target, with a buyer. Whether it’s a plan for an upcoming pitch, or a proposal nearing a signature, a Deal offers the ability to accurately update your pipeline with any business currently on the table.
To Get Started:
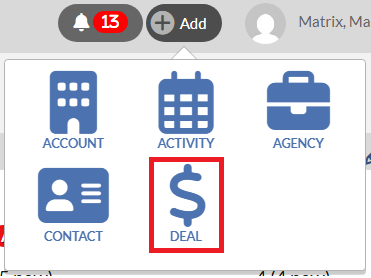
1) Click on the Add button at the top right of your screen.
2) Select Deal.
3) Begin typing the Account you wish to create the Deal for and select the name from the drop-down menu. Your name will not show up on the drop-down menu if it is a Lead Account. You can ONLY Add a Deal to either a Prospect or a Billing Account, NOT to a Lead Account.
4) Once you select the appropriate accounts click Save, and this will take you to the Deal Profile page.
The Deal Profile Page
The profile page for your Deals is a one-stop-shop for you to update your forecast for a particular Account, and track all of the various ins-and-outs of this opportunity. There are 8 sections on the Deal profile:
Header
The option to Clone the Deal, the Due Date, Sales Stage, and Deal Status can all be edited from the top bar of the Profile Page.
1. Deal Name - is auto-filled with the Account name followed by Deal, but this can be changed by clicking the pencil icon located next to the deal name and typing the name of your choosing.
2. Account name - When you click on the Account name, it will bring up the Account profile.
3. Salesperson Name - When you click on the Salesperson name, it will bring up their scorecard.
4. Section Names - Showing each sections on the Deal profile. When you click on the section name, it will take you to that section of the Deal Profile.
5. Clone Deal - The Clone Icon allows you to cone your deal. Clicking on this icon will copy over the following into a new pending deal: Office, Sales Stage, Weight, Net Amount Status and Percentage, Account/Agency, Contact, Category, and Salesperson. To learn more about clone deal, please click here.
6. Office - Click directly on the office in order to select the Office that the Deal should be placed on.
7. Due Date - When do you expect the Deal to close? Matrix will default to thirty days from the date of entry, but you can manually change the date as needed.
8. Sales Stage - What stage of the sales process is this deal in? Most likely your sales stages have been customized to reflect your group's sales process.
9. Deal Status:
- Open Proposed - Your soft pending. These dollars will not display in the forecasting reports/pods.
- Open Pending - Your hard pending, to be used when you are committed to adding dollars to the forecast
- Closed Lost - Update the status of Deals that are lost to CLOSED-LOST, and enter the reason and comments so you can reference this information in the future
- Close Won - If Matrix did not automatically reconcile a “won” deal, update the status to CLOSED-WON to clear out your pending after your booked dollars have been imported.
10. Wgtd Value - shows the total weighted pending amount.
Details
Click the down arrow to expand your details and you'll get more information regarding your Deal, such as the agency, contract, category association, or setting the time frame.
1. Weight - What is your confidence level in this Deal closing. Click on the weight and use the slide rule to select your desired percentage, or this may be pre-selected based on your Sales Stage.
2. Agency/Contact/Category - If your Account has previous history these may already be filled out, but this will allow you to ensure your Deal is associated appropriately.
3. Time frame - What is the run time of this particular opportunity. Select the start month and duration of the Deal your pitching, or forecast your entering.
Pending Dollars
This is where you'll be able to plug in the expected revenue that you hope to close with this Deal.
If you would like to copy your Budget Totals to a Deal, you can click Update Pending From Budget.
Note: This is done 1 Account at a time. Your Deal Line has to match up with your Budget Line. Same Salesperson, Account, Rev Type, Outlet and Months.
1. Outlet - Click into the Oulet field and then select Outlet from the list. The list of choices is limited to the Outlets that you have access to. Note that If you've already set up your Deal Preferences within your profile you'll have some lines available to put dollars against. To learn more about Deal Preferences, please click here.
2. Rev type - Click into the Rev type field and then select Rev type from the list.
3. Project - Click into the Project field and select the Project from the list.
4. Comm - Click into the Comm filed and type in a commission number.
5. Pending Dollars - Click into the pending field and type in a pending dollar amount in the appropriate months.
6. Copy, Split, Delete - You also have several Short Cuts available for each row by clicking the menu icon on the right of the row and select Copy, Split or Delete.
- Copy - Select the pending amount to propagate across all months for the desired outlet. Don't forget to click Save.
- Split - Type in the total Deal amount for the desired time frame and have Matrix calculate the split across the selected months.
- Delete - Delete the entire row.
7. (+)Add Row - If you need to create a row or add more, simply click (+) Add Row in the bottom left of this pod.
Revenue Comparison
Look back at the historical years and months and establish trends to help you determine how the account might spend in the future. This will either provide an apple to apples comparison of what they spent previously vs what you are forecasting on, or you can select Show Full Billing History, and that will display their spending regardless of what you are forecasting on.
1. Calendar Type -You can select the calendar type that you wish the revenue amount to display. By default, the Account’s revenue will display based on your default calendar type for last year.
2. Time Frame - You can select the time frame that you wish to view the revenue amount.
3. Show Full Billing History - Check this box If you wish to see full revenue history. When unchecking this box, the revenue amount displays for the Outlet/Revenue Type combinations specified on the Pending Dollars section located above Revenue Comparison section. If the Pending Dollars section does not contain any rows, then the Revenue Comparison section will be blank.
Contacts
1. (+) - To add a contact, hover your mouse on the top right of the Contact section. Then (+) button will show. Click(+) to add a contact into the Contacts section.
2. Contact name - Click the Contact name, it will bring up the Contact Profile.
3. Company - This is an Account or Agency name. Click the Account or Agency name, it will bring up their profile.
4. Email - You can send an email to the contact by easily clicking the email. Your default mail window will show with Matrix Activity mail on the BCC field.
5. Menu icon via Remove - You can remove the Contact by clicking menu icon and select Remove.
Activities
You also have full visibility into any activities affiliated with this Deal in the Activities Pod.
1. Incomplete/Complete - You can toggle between Incomplete and Completed Activities.
2. Activity - When clicking on the Activity Date or Subject, Activity profile will shows.
3. Contact name - Click the Contact name, it will bring up the Contact Profile.
4. Notes - You can hover over the note icon to view your activity note.
5. Menu icon via Comlete or Delete - Use this menu options to complete or delete the activity. This is a great tool to ensure you're staying on task with your to-do items for this opportunity.
Matrix Locker
There is where you can store your document.
1. Name - This is a document name. When you click on the document name, the file will be downloaded into your computer.
2. (+) - When you hover your mouse on the right top of the Matrix Locker pod, (+) button will show. To add a new document, please click (+) button.
3. Bin icon - When you click this bin icon, the document will be permanently deleted.
Notes:
General notes that you'd like to make regarding the Deal can be entered at the bottom of Deal profile page within this pod.
These notes will also push to your Forecast Report when requested.
1. (+) - When you hover your mouse on the right top of the Notes pod, the (+) button will show. To add a new note, please click (+) button.
2. Menu icon - Use this menu options to edit or delete the note.